This Food Blogger’s Guide to Google Adsense post includes affiliate links. When I find a great product or service, I like to share it with my readers. Sometimes I use affiliate links so I can earn commission for my recommendations. Thank you for your support!
A Food Blogger’s Guide to Google AdSense
Ever wonder how bloggers make money? If you’re looking to make money blogging, then my Food Blogger’s Guide to Google Adsense will show you how. Learn how to set up a Google Adsense account, manage your ad content and get started making money with Google Adsense!
What is Google AdSense?
If you’re not familiar with it, Google AdSense is one of Google’s many tools available to content creators. When used properly, it’s a great way to generate income for all of the hard work you’ve put into creating content and driving traffic to your blog. In this simplest terms, Google AdSense matches advertiser’s ads to your blog’s content. These ads are placed on to your blog and when a consumer clicks on them, you get paid.
In this blog post, I wanted to share my personal experience with Google Adsense as a means of demonstrating how the program works. I’ll talk about:
- What Google Adsense is
- How Google Adsense works
- Installing Google Adsense
- Managing ad content, ad type, ad placement and ad size within Google Adsense
Let’s get started!
Some Friendly Advice to Heed Before Installing Google Adsense
Passive income sounds great, doesn’t it?!
It is. It’s better though when you know what you’re doing, so I’m kicking off this blog post with a cautionary tale the moral of which is: Take the time to understand how Google Adsense operates before installing it. Lucky for you, I’ll share my mistakes so you can avoid them.
As you may already be aware, I operate a food blog — Herbivore’s Kitchen — that focuses on vegan recipes. I had been running Herbivore’s Kitchen for about a year when I decided that I wanted to start generate income from advertising. I use Google for all aspects of my blog’s management, so I decided on Google Adsense.
To be fair, I did this at the very wrong time. I was knee-deep in writing my first cookbook so I had no time for anything else. I applied to Google Adsense, installed the ads and then went right back to writing my book. Fast forward several weeks later… I’ve turned in my final manuscript and am just getting back to working on my blog. I hop on and screeeeetch….there, right in the header for my food blog, is an advertisement for removing ear wax. And it is graphic. I mean, it is up close and personal with ear wax.
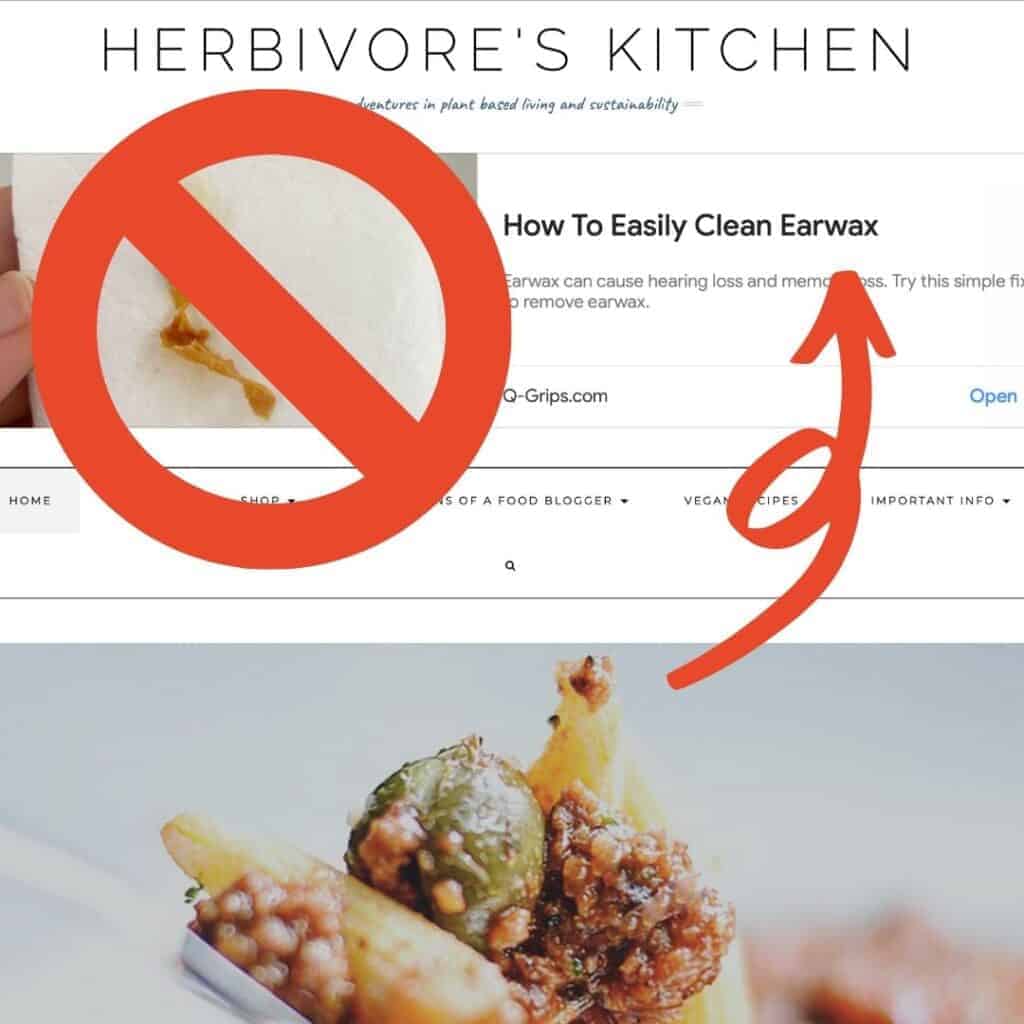
So gross, right?!
First, I panicked a little. How many people searched for vegan ramen noodle bowls only to get turned away by the image of ear wax? Then I dug in and learned how to fix it. As you’ll learn below, Google Adsense does have a process for determining what ad types, size and placement are most likely to generate income for your blog. But, as I learned the hard way, it’s not a perfect system on its own. It requires a little blogger finesse.
The Basics: Setting Up a Google AdSense Account
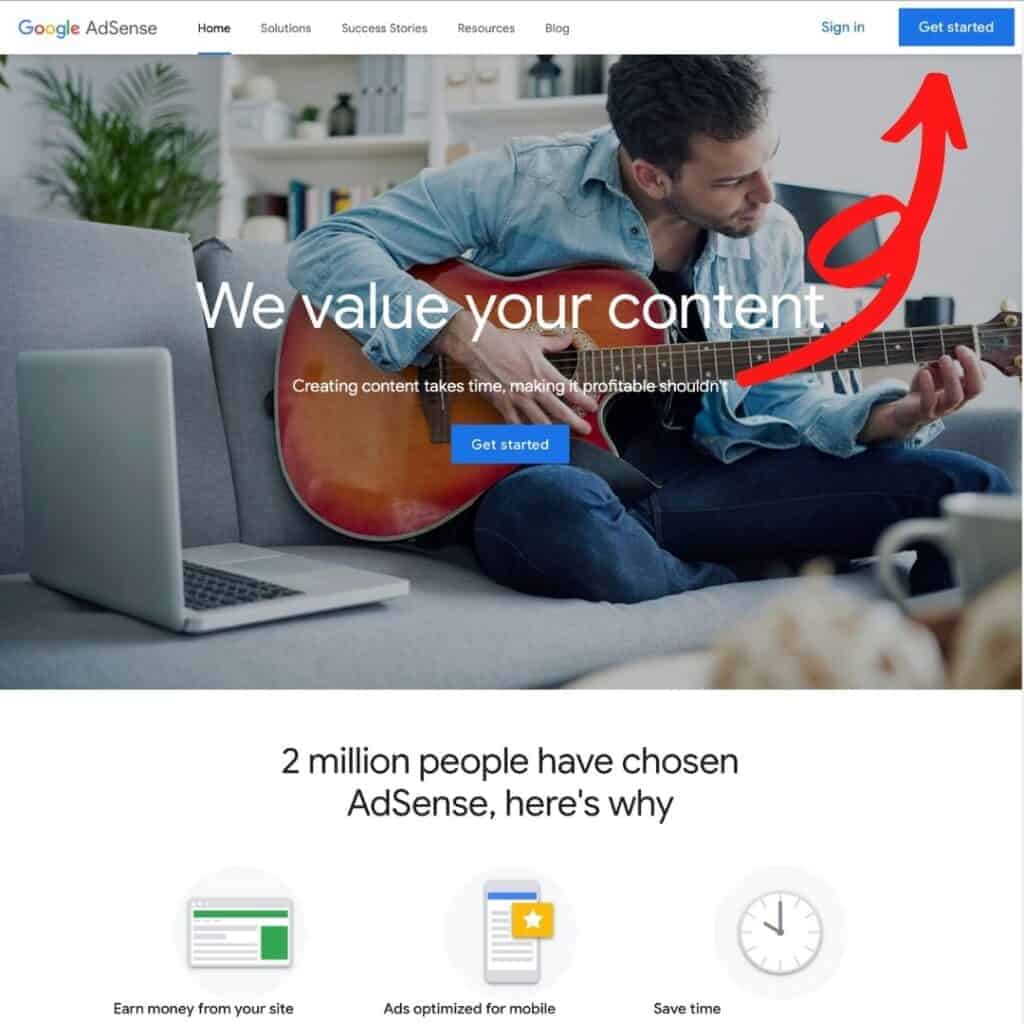
Adsense is free for bloggers. To get an Adsense account, you need to first have a Google account. You can set up a Google account here. Once you’re signed into your account, you need to go to Google AdSense’s Get Started Page and click the Get Started icon in the upper righthand corner. This will start the process of setting up your account.
Once you’ve completed this step, the Google Adsense team will review your application. This may take some time, so be patient. Once you’ve been approved, you will receive an email from Google Adsense providing you with instructions for inserting Google Adsense ads on your blog.
The steps needed will vary depending on your blog’s platform. For example, my blog is built on WordPress, but you can also have Google Adsense ads on your YouTube channel. Each of these platforms has a process for installing the ads. Google Adsense has articles to help with this as do various third parties.
Google Adsense Manual Ads Versus Auto Ads
Once you’ve been accepted into the Google Adsense program, you will have two choices for determining how Google Adsense ads will be displayed on your blog. One is manual and the other is automatic.
In the manual mode, you can create blocks on your blog that are specifically designed to receive ads. In WordPress, you do this by creating a Custom HTML widget and populating it with the ad code provided by Google. Manually creating space is advantageous because you get to choose the ad type, size and placement of the ads. This enables you to maintain aesthetic control over the look and feel of your blog. The disadvantage of manually creating ads is that it takes a fair amount of time and it doesn’t fully capitalize on Google’s algorithm for optimizing ad type, size and placement for maximum income generation.
The other option — the automatic option — allows Google to display ads on your blog in accordance with what it determines is most likely to optimize income. It’s quick and easy to install with one piece of code. Of course, using this option means you’ll lose some control over the aesthetics of your blog, but Google does have some tools you can use to manage ad type*, frequency and size in general.
[*Note: It is important to note here that ad type is distinguishing between display ads, in-feed ads and in-article ads. It’s not enabling you to chose the content of the ads. That is controlled differently, but applies to both manual and automatic ad installation. I discuss as content control below.]
When I installed Google Adsense, I opted for the automatic placement. I’m not great with coding so the less I can break, the better. As you already know I was frustrated with the lack of control at first. I’ve since learned a lot about how to manage Google Adsense and now I am happy with this choice overall.
Google Adsense: A Little Background
When getting into online advertising, I found it helpful to understand the mechanics of Google’s ad delivery product. For example, how are ads chosen? Who pays for them? Is the blog’s audience considered in the placement? Had I paid more attention to this, I might have foreseen ear-wax-gate.
The ads served through the Google Adsense program are determined through a Google-hosted auction. Through this auction, advertisers bid the maximum amount that they are willing to pay to have their ad displayed on a site utilizing Google Adsense. The winning bidder’s ads are then matched to blogs and other websites using keyword analysis and word frequency. Through this process, Google determines which websites and/or blogs will have an audience with whom the ad will resonate.
How Do You Control What Ads Appear on Your Blog?
To give bloggers and website owners control over ad content appearing on their sites, Google offers an ad-blocking option. The ad-blocking option shows you the ads eligible to display on your site and allows you to block those ads specifically. To get there, take a look at your Adsense menu (the lefthand side of your screen). There you should see a category called Blocking Controls. Below that there will be a link for Google Adsense’s Ad Review Center. This is where you can control what ads will not appear on your blog by blocking them.
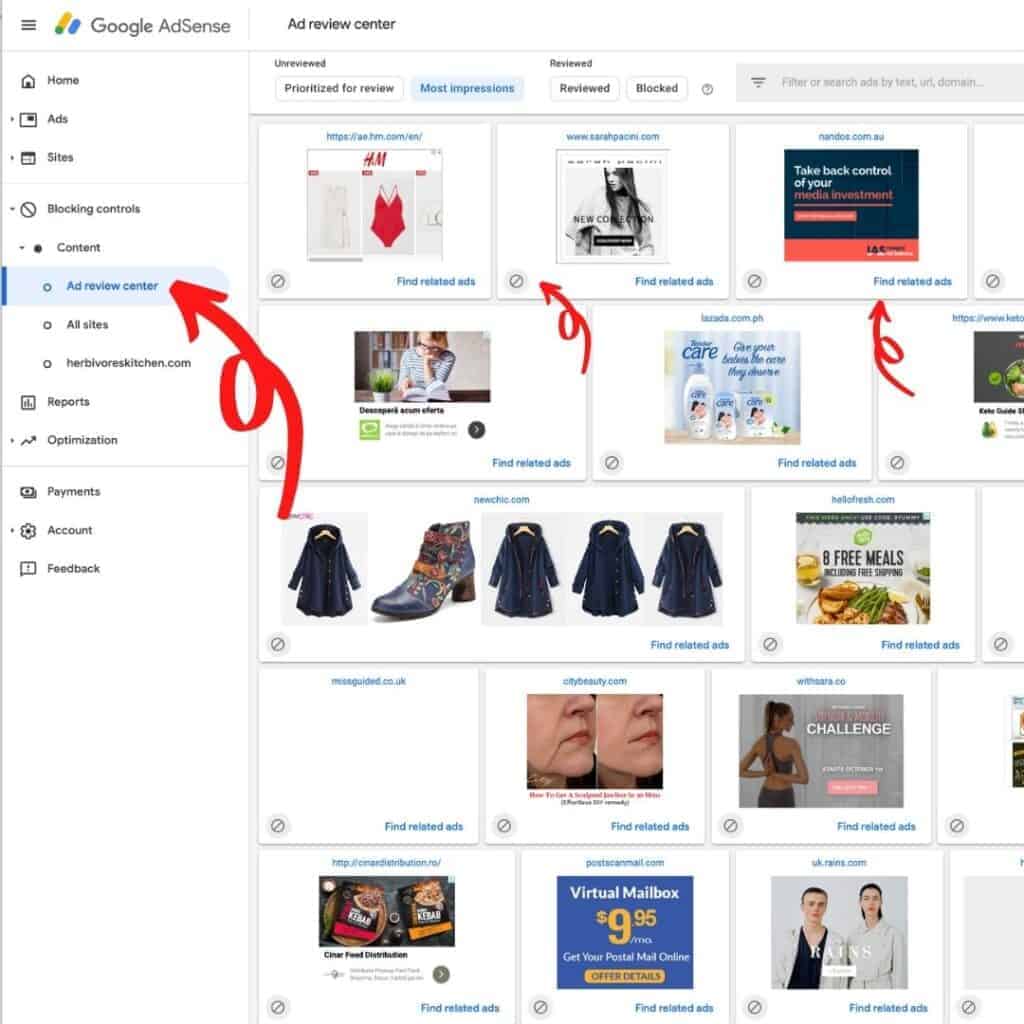
Here’s how it works: the Ad Review Center will show you the ads that are currently appearing on your site. By clicking on the circle backslash symbol, you can block a particular ad from appearing. Even more handy, you can see other similar ads and block those as well. This helpful tool enabled me to remove ads for treating toenail fungus and how to catch mice in your house. Definitely not food blog eligible.
A More Robust Tool: Google Adsense’s URL Blocking
So, does blocking individual ads work? It does. Sort of. Unfortunately for me, my tale didn’t end with that. Several weeks after I blocked the ads I deemed inappropriate, I was cruising my site and again… an ad for removing ear wax. As it turned out, I had blocked specific ads but the advertiser was constantly creating new ads. Those new ads were continuing to populate my blog.
When the earwax ad reappeared, I was discouraged. My first thought was: Am I going to have to add “visit Google Adsense’s Ad Review Center” to my daily to-do list to keep removing these ads? Rest easy though, there is a better way. In addition to blocking individual ads, Google Adsense allows bloggers to block entire URLs. By blocking the root URL for these ads, I’ve effectively eliminated the possibility that this advertiser’s ads will appear on my blog.
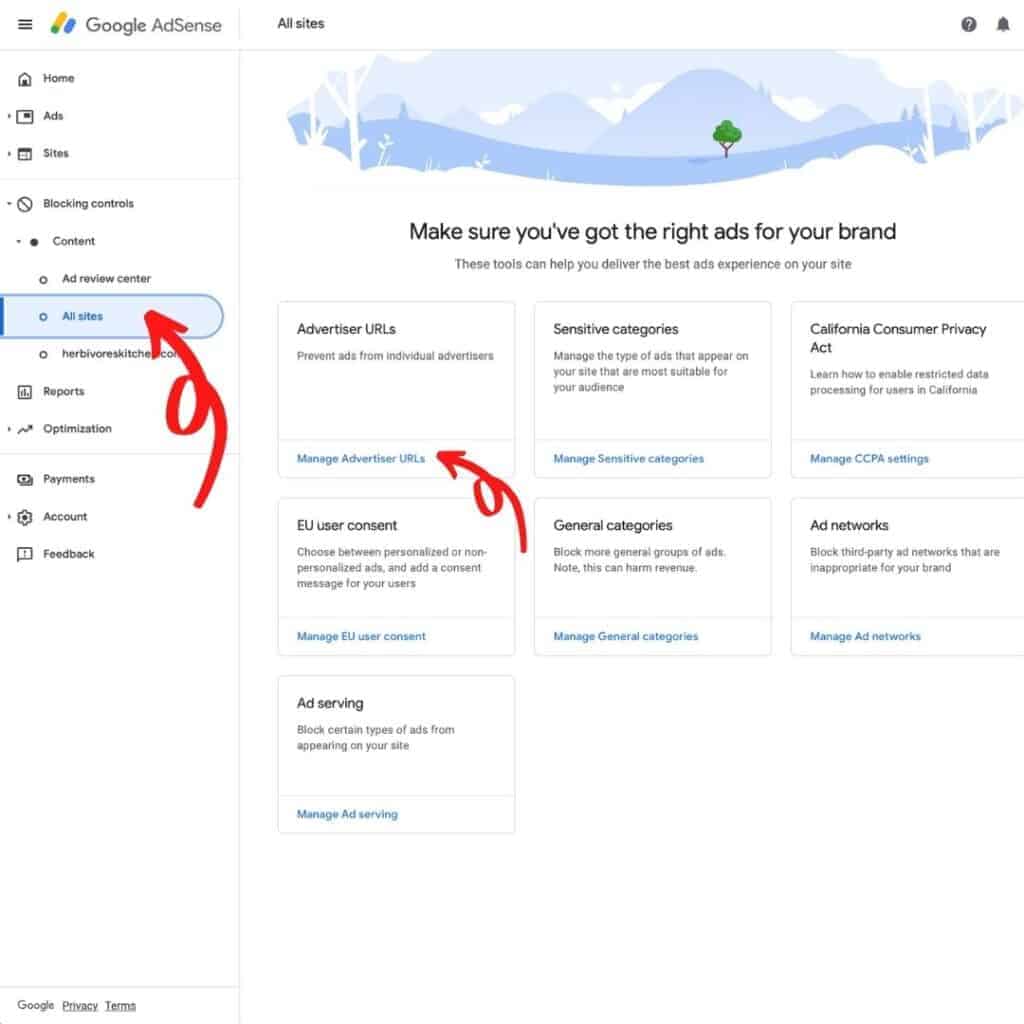
To block a URL, go to Blocking Controls —> All Sites. On the All Site’s page, there will be an option to block Advertiser URLs. Click on Manage Advertiser’s URLs. Once there, you can add a specific URL to be blocked. As you can see, I’ve already blocked the earwax removal guys.
How Do You Control Placement of Ads with Google Adsense?
Ad placement is another area where you can get tripped up, so read carefully. [Note: this applies if you’ve chosen Google’s automatic option, discussed above.]
When you set up your Google Adsense account, Google will ask you the number and type of ads you want displayed on your blog. This is important because it allows you to measure your desire to make some extra income against your user’s experience — both in where the ads are placed and how many ads appear on your blog.
For me, this is critical. I love the idea of passive income, but not to the detriment of someone just. trying. to. scroll. to. the. damn. recipe. already! We have all had this experience at one time or another. You look up a recipe only to be bombarded with advertisements. So many that you can’t even find the recipe and you leave. No one wants that. Not your end user and not you.
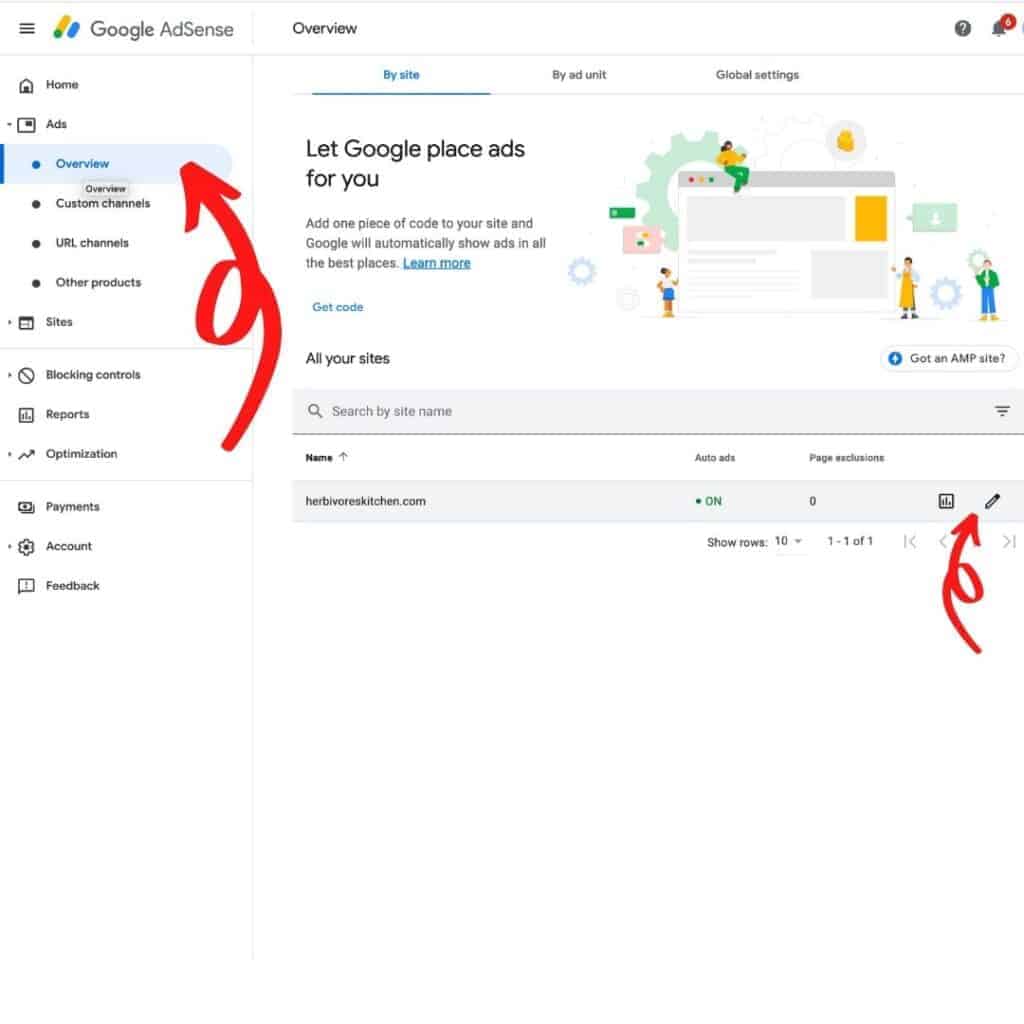
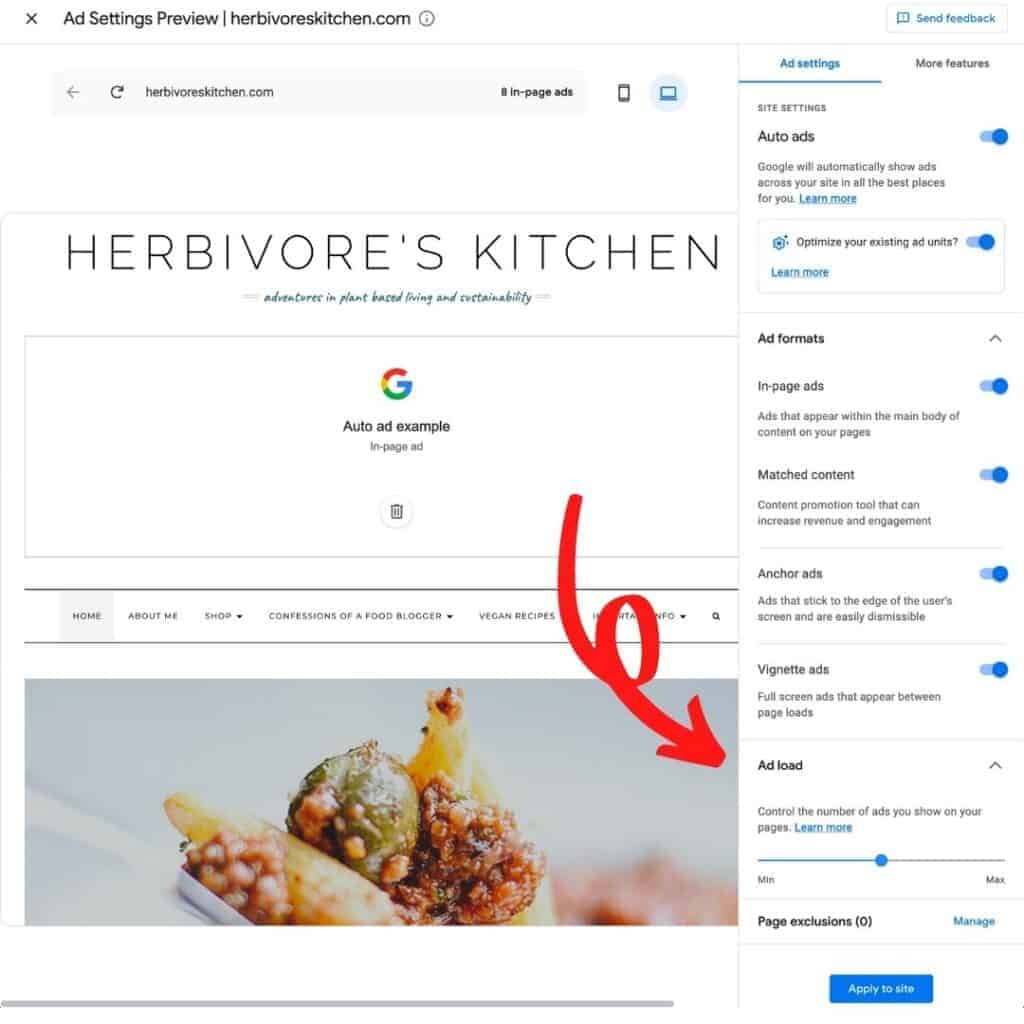
You can easily change these metrics in Google Adsense by clicking on the Ads Overview tab. From there, you need to edit your Ads by Site. On this page, you’ll see your blog’s URL listed with the option to edit it (the pencil on the far right). Clicking on the pencil will take you to the Ad Settings Preview page. There, on the righthand side, you’ll see your different options for ad display. You can control ad formats, ad load and page exclusions.
Now Get Going Making Money on Your Food Blog!
Now that you have some insight into Google Adsense, get going on monetizing your blog! Ad delivery services are a great way to generate passive income and be rewarded for all the hard work you do creating and photographing your awesome recipes!
Want to learn more about starting a food blog? Check out my Confessions of Food Blogger section for articles on writing a food blog, taking great food photographs and making money as a food blogger!
Have a question or a story you want to share? Let me know in the comments below!
About Herbivore’s Kitchen
Herbivore’s Kitchen is a blog run by me, a plant-based home chef and aspiring food photographer. I switched my and my family’s diet to a plant-based diet after learning about the health benefits of going vegan. Making this change has prompted a variety of food and holistic-lifestyle related questions that I explore through this blog. I talk about how to pick and prepare the most nutritious foods, to how to reduce waste at home, to how to live a more sustainable lifestyle while on the road.